
leak detection
Slab Leak Detection and Repair: A Step-by-Step Guide for Fine Homes
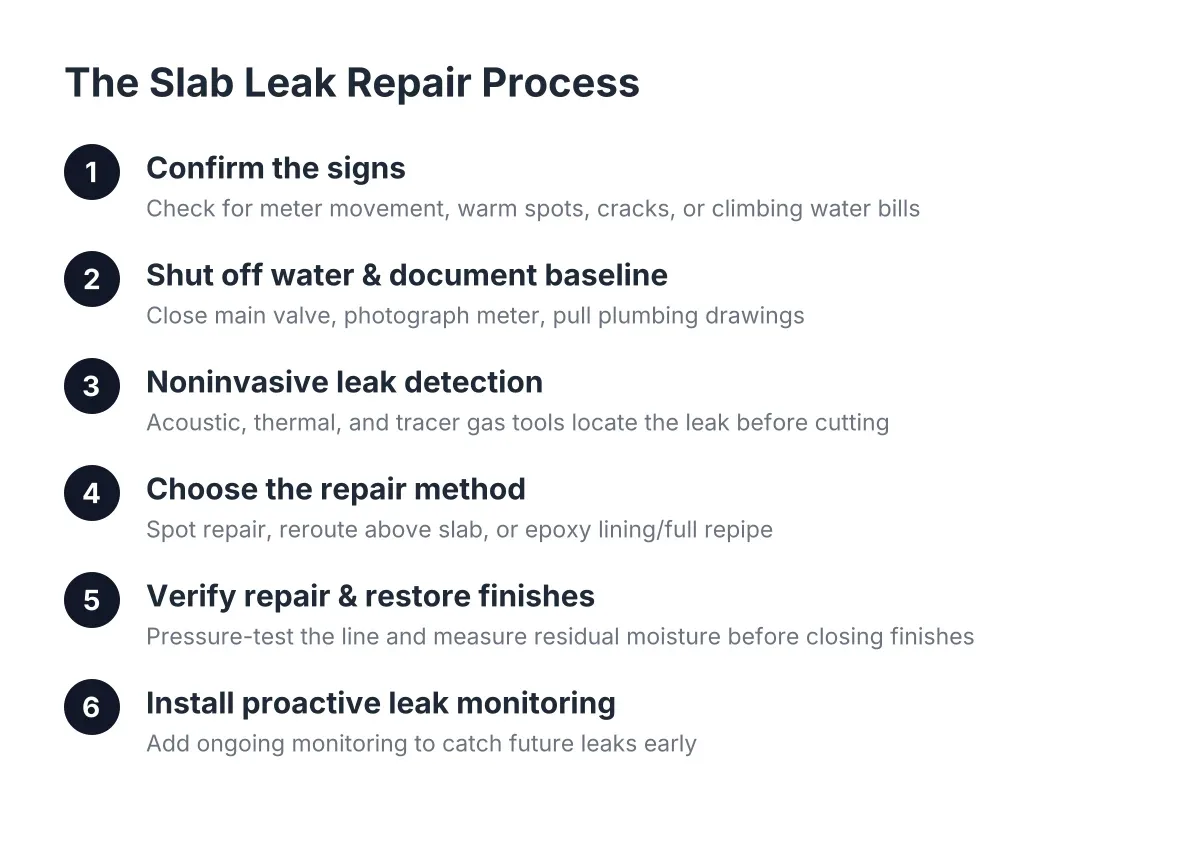
A slab leak does not announce itself. It works quietly under the concrete, undermining terrazzo, wide-plank oak, and the subgrade an architecturally significant home stands on. This guide walks through the slab leak repair process as a sequence, from first warning sign to verified fix, written for owners and architects who treat it as preventive estate care rather than an emergency plumbing call. For a Westside home with finishes and installations worth protecting, the order of these steps matters as much as the repair itself.
The stakes are not abstract. According to the U.S. Environmental Protection Agency, ten percent of U.S. homes have leaks severe enough to waste 90 gallons or more of water per day, and the average household's plumbing leaks can waste more than 10,000 gallons each year. Under a slab, that water has nowhere to go but into the structure.
Step 1: Confirm the Signs of a Hidden Water Leak
First, verify that what you are seeing points under the slab rather than at a fixture or the roof. The signs of a hidden water leak below grade are distinct.
- A water meter that moves when every fixture is off
- A warm spot on the floor, often from a hot-water line
- Cupping or lifting in hardwood, or hairline cracks tracking across stone or tile
- The sound of running water behind silence
- A water bill that climbs with no change in use
- Musty odor or efflorescence along baseboards in older homes
Moisture damage in older homes deserves particular attention. A 1950s post-and-beam on the Westside may carry original copper in or under the slab, and sixty years of water chemistry and soil movement take a toll. If two or more of these signs appear together, move to the next step the same day.
Step 2: Shut Off the Water and Document the Baseline
Next, close the main supply valve and photograph the meter reading. Wait thirty minutes with the valve open again and all fixtures off; if the meter's low-flow indicator turns, water is escaping somewhere in the system.
Document everything before anyone opens a wall or floor. Photograph the affected rooms, note which finishes sit over the suspect area, and pull the plumbing sheet from the original drawings if the architect's set is available. For a home we built or renovated, that documentation already exists; estate management clients have the house watched, and this baseline is on file before a leak ever starts.
This is also where a permanent safeguard belongs on the list. A 2020 LexisNexis Risk Solutions study of 2,306 homes found that installing an in-line water shutoff device correlated with a 96 percent reduction in escape-of-water insurance claim events. If the house does not have one, the repair visit is the right time to add it.
Step 3: Bring In Noninvasive Slab Leak Detection Before Anyone Cuts
A proper water leak detection service locates the leak before a single saw touches the floor. This is the step that separates a careful contractor from one who opens concrete on a guess.
The tools are specific. Electronic acoustic listening equipment picks up the hiss of pressurized water through the slab. Thermal imaging maps temperature differences from a hot-line leak. Tracer gas and line-pressure isolation narrow the leak to a single run. Together they fix the location to within a foot or two, which is the difference between lifting four tiles and demolishing a room.
Homeowners searching for water leak detection near me will find plenty of providers who can find a leak. The harder question is who opens the floor afterward. In a home with book-matched stone, a sculpture on an engineered pad, or flooring milled to the architect's spec, detection and repair should sit under one roof with the people who understand the finishes above the pipe. One limitation worth stating plainly: no instrument is infallible, and in rare cases a leak under thick post-tension slabs or beneath built-in casework still requires exploratory access. An honest provider says so before cutting.
Step 4: Choose the Repair Method That Protects the Structure
Once the leak is located, the slab leak repair process offers three main paths forward. The right choice depends on pipe condition, slab construction, and what sits on top of it.
Understanding the Slab Leak Repair Process Through Spot Repair
The crew opens a small section of concrete directly over the leak, repairs the pipe, pressure-tests the line, and closes the slab. This suits a single pinhole in otherwise sound copper. The critical skill is not the plumbing; it is cutting, protecting, and restoring the finish floor so the repair disappears.
Reroute above the slab
When the under-slab line has failed once, it will likely fail again. A reroute abandons the buried run and carries a new line through walls or ceiling. In an architecturally significant home, routing is a design decision. The new line must respect the architect's intent, which means coordinating chases, soffits, and access panels with the drawings rather than improvising through them.
Epoxy lining or full repipe
Lining coats the interior of existing pipe without opening the slab. A full repipe replaces the system. For an estate approaching a planned renovation, folding the repipe into that scope avoids opening finished floors twice.
Step 5: Verify the Repair and Restore the Finishes to the Drawings
A repair is not complete when the water stops. Pressure-test the repaired or rerouted line and hold the test long enough to trust it. Then measure residual moisture in the slab and framing with meters, not by eye; concrete releases water slowly, and sealing damp floors under new finishes traps the problem.
The slab leak repair process requires restoration done to the drawings, with the original finish schedule in hand. Water intrusion repair is where most slab leak jobs fail the homeowner. A plumbing crew patches concrete; it does not re-lay herringbone oak or match a honed limestone field. This is why an architect referring a client wants one contractor accountable for the pipe, the slab, and the floor above it, rather than three trades pointing at each other.
Step 6: Put Proactive Leak Monitoring in Place
Finally, treat the repaired leak as the first data point, not the last. Leak detection works best as a standing discipline: annual pressure tests on supply lines, moisture readings at known-risk locations, meter audits, and a flow-sensing shutoff valve on the main. For homes under our estate management, this is part of readiness; the house is watched, and a second leak gets caught at the meter rather than at the floor.
Suppose a Brentwood owner with a 1960s home notices a warm stripe across the kitchen's limestone floor. In that scenario, acoustic detection isolates a hot-line pinhole under the island, the crew reroutes the run through a pantry wall, and three salvaged stones go back in their original positions. The visible result is nothing. That is the standard.
What Slab Leak Detection and Repair Depend On
The scope of slab leak detection and repair varies with four factors: how precisely the leak is located, slab construction, the repair method chosen, and the finishes that must come up and go back down. A spot repair under replaceable tile is the simplest case. A reroute beneath restored period flooring is a larger undertaking, and the restoration is usually the larger share of it. Be wary of any quote delivered before detection is done; a fair proposal names the detection method, the repair approach, the finish restoration scope, and who carries each.
Timing is working against waiting. The Joint Center for Housing Studies of Harvard University projects annual home renovation and repair spending to reach $519 billion through mid-2027, and demand for skilled trades on complex homes remains tight. A small leak addressed this season costs less than the same leak a year from now, in both water and structure.
Questions to Ask Before You Hire for Slab Leak Detection and Repair
Three questions sort providers quickly:
- What detection methods do you use, and will you locate the leak before quoting the repair?
- Who restores the finishes, and have you done it on homes of this caliber?
- Will one firm carry the plumbing, the structural work, and the restoration?
For Westside homes, the answers matter more than the search results for slab leak detection and repair near me. Dick Minium Construction has handled leak detection and elimination inside architecturally significant homes for more than thirty years, with the plumbing, structural, and finish work under one roof and built to the drawings. If the signs in Step 1 are present, or if proactive monitoring belongs in an estate's readiness plan, one call reaches the workshop: 310.392.6622.
If this is the work you are planning, Dick Minium Construction is one call away: 310.392.6622.
Prefer to talk it through? Call (310) 392-6622 — a quick call is usually the fastest way to get a straight answer for your situation.